Travis CI (Android)
Build, sign, and package an Android project with Travis CI, then auto-publish the signed apk to Pgyer.
This page walks through setting up Travis CI for an Android project and auto-publishing the signed apk to Pgyer.
Travis CI Editions
Travis CI is a continuous integration service for projects hosted on GitHub. The product comes in two editions:
- Travis CI.org: free for open-source projects on GitHub.
- Travis CI.com: paid for private projects.
Prerequisites
You'll need the Travis CI command line tool installed locally.
-
Make sure your local Ruby is 1.9 or later:
ruby -v -
Install Travis CI (on macOS, upgrade Ruby to the latest version first):
gem install travis --no-rdoc --no-ri -
Verify the install by printing the version:
travis -v
Enable Travis CI
Sign in to Travis with your GitHub account. Travis syncs every open-source project under your account; select the one you want to enable.

Create the Travis CI Build
Add a .travis.yml at the project root to describe the build.
Travis CI provides basic build and language support; you can customize the build via .travis.yml within its build lifecycle — see the official docs.
Validate the file's syntax with:
travis lint [path to your .travis.yml]When the syntax is valid you'll see a confirmation:

Android Project Template
Define the following in .travis.yml:
language: android       # Language
jdk: oraclejdk8         # JDK version
sudo: required          # Privilege requirement
env:                    # Environment variables
  global:
  - ANDROID_API=26
  - EMULATOR_API=21
  - ANDROID_BUILD_TOOLS=26.0.2
  - ADB_INSTALL_TIMEOUT=5 # minutes
android:                # Android environment
  components:
  - tools
  - platform-tools
  - build-tools-$ANDROID_BUILD_TOOLS
  - android-$ANDROID_API
  - android-$EMULATOR_API
  - extra-google-m2repository
  - extra-android-m2repository     # For the design library
  - addon-google_apis-google-19    # For Google Play services
  - sys-img-armeabi-v7a-android-$ANDROID_API
  - sys-img-armeabi-v7a-android-$EMULATOR_API
  licenses:             # Licenses to accept
  - android-sdk-preview-license-.+
  - android-sdk-license-.+
  - google-gdk-license-.+
The Android versions here must match the ones used by your project. If the build needs additional android or build-tool versions, declare them here too, otherwise CI fails with an error like the one below:

Cache (Optional)
A cache avoids redownloading dependencies on every build. After changing the base environment (say, the Gradle version), clear the cache first.
before_cache:
- rm -f $HOME/.gradle/caches/modules-2/modules-2.lock
- rm -fr $HOME/.gradle/caches/*/plugin-resolution/
cache:                  # Cached directories
  directories:
  - $HOME/.gradle/caches/
  - $HOME/.gradle/wrapper/
Travis CI's cache can also be cleared from the UI:

Start the Emulator (Optional)
Add this only if your tests require an emulator.
The Android version declared for the emulator must also appear in the android section of .travis.yml, otherwise booting the emulator fails and the Travis CI run ends in errored.
before_script:
- echo no | android create avd --force -n test -t android-$EMULATOR_API --abi armeabi-v7a
- emulator -avd test -no-skin -no-audio -no-window &
- android-wait-for-emulator
If the emulator's Android version isn't in the components list, you'll see this error:

Run Scripts
To run tests:
script:
- ./gradlew clean build connectedCheck -PdisablePreDex --stacktrace
To build a release apk directly:
script:
- ./gradlew assembleRelease
Auto-signing the apk
-
Generate an apk signing file in Android Studio (Build → Generate Signed APK → Create new) to produce a
.jks: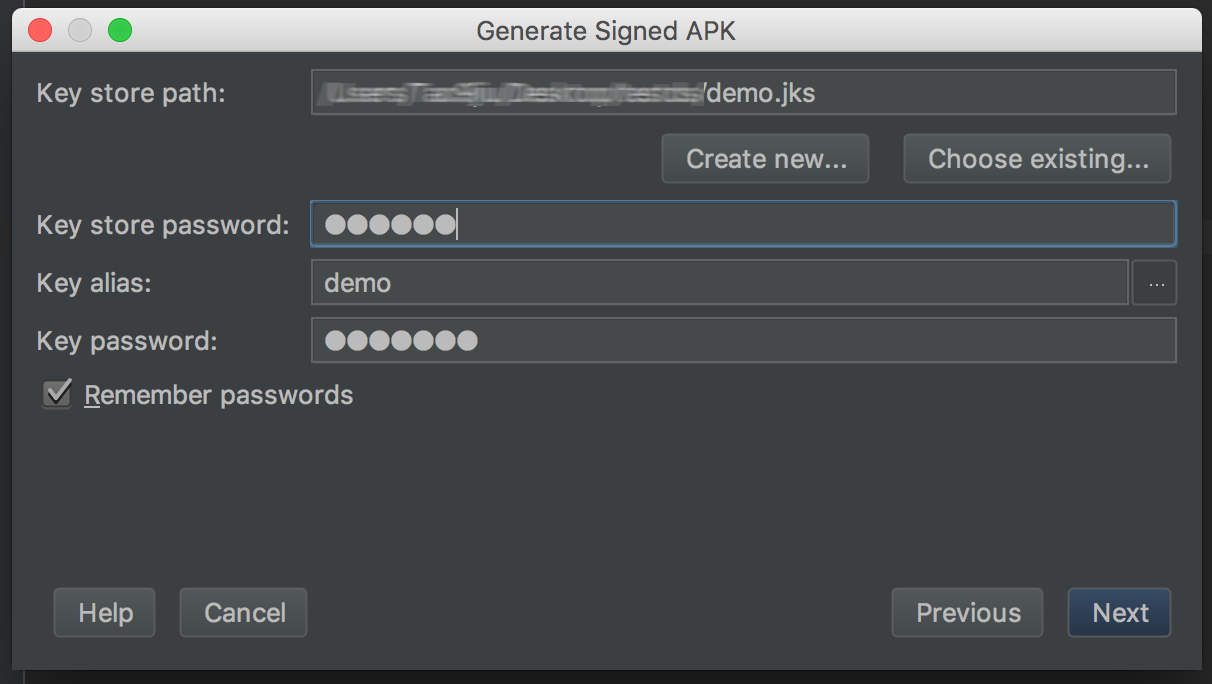
-
Sign in to Travis with your GitHub account:
travis login # Enter the GitHub username and password for the project -
Encrypt the signing file with the Travis CLI (the encrypted file should be committed alongside the project):
travis encrypt-file [filename].jksThe command produces an encrypted
*.jks.encand prints a command to add under thebefore_installlifecycle: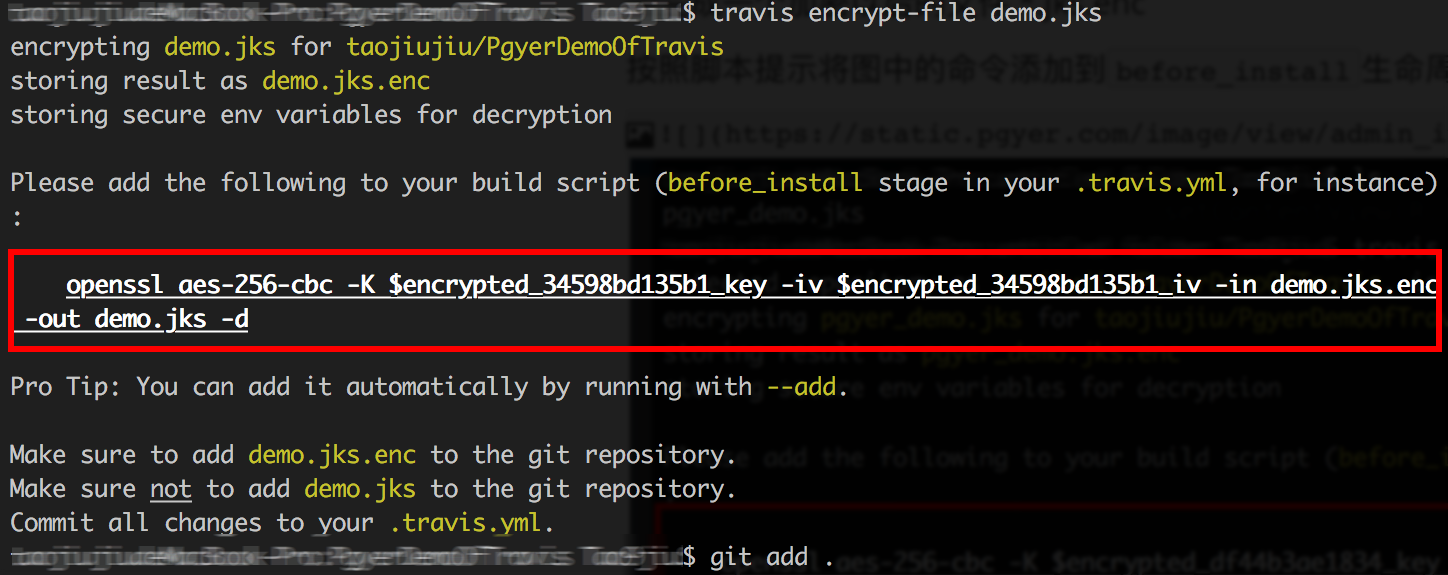
before_install: - openssl aes-256-cbc -K $encrypted_df44b3ae1834_key -iv $encrypted_df44b3ae1834_iv -in demo.jks.enc -out demo.jks -d -
Encrypt the signing file's credentials:
travis encrypt storepass=YOUR_STORE_PASSWORD --add env.global
travis encrypt keypass=YOUR_KEY_PASSWORD --add env.global
These commands add entries under
env: global:in.travis.yml: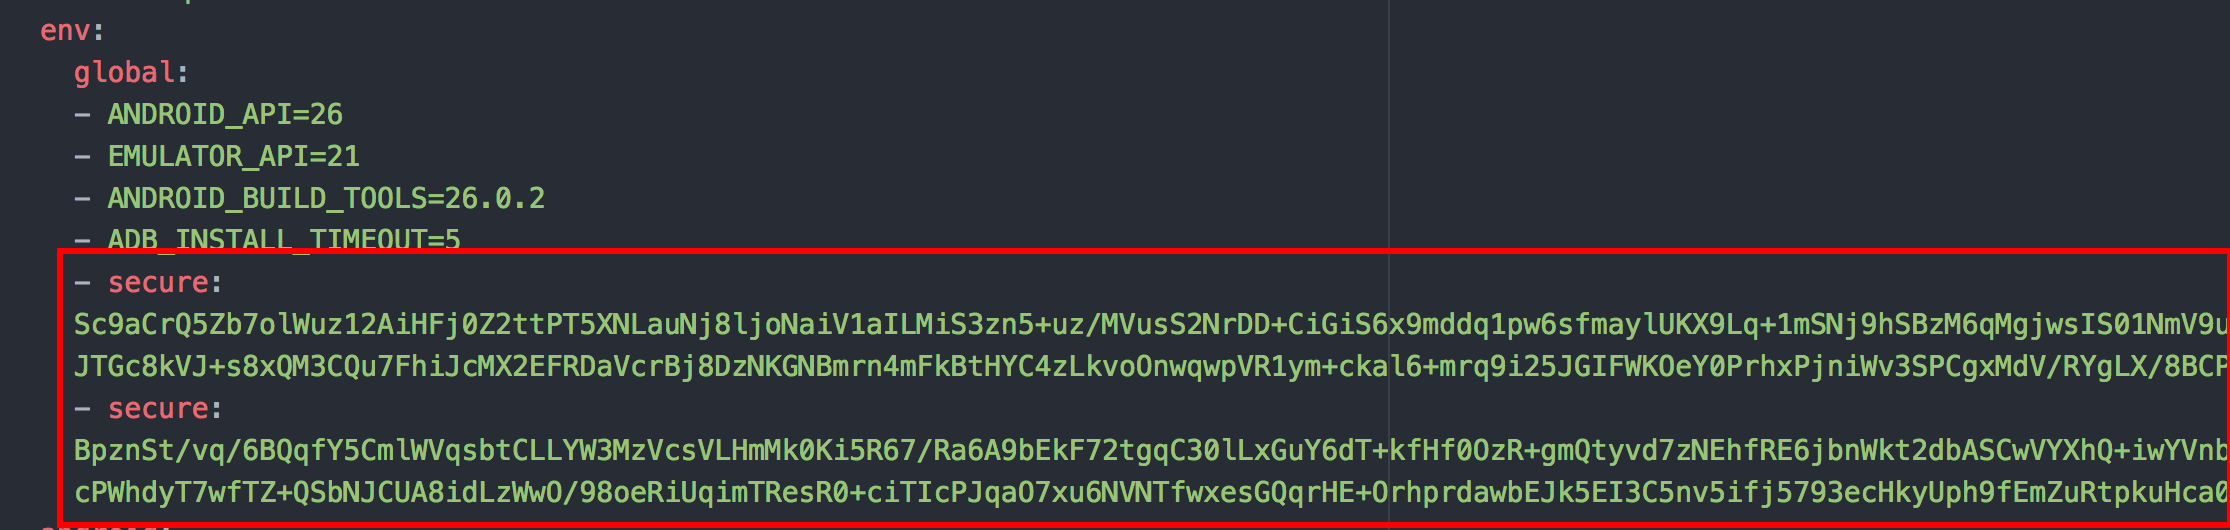
If you switch the GitHub account that owns the same signing file and keys, log out of the current account, log back in, and regenerate every encrypted entry:
travis logout travis login -
Configure the Travis CI build pipeline:
after_success:
- cp $TRAVIS_BUILD_DIR/demo.jks $HOME
- cd app/build/outputs/apk/
- jarsigner -verbose -sigalg SHA1withRSA -digestalg SHA1 -keystore $HOME/demo.jks -storepass $storepass -keypass $keypass app-release-unsigned.apk demo # demo is the signing file's key alias
- jarsigner -verify app-release-unsigned.apk # Verify the unsigned apk
- "${ANDROID_HOME}/build-tools/24.0.2/zipalign -v 4 app-release-unsigned.apk yourapp.apk"  # Optimize and rename the apk
Upload the apk to Pgyer
-
Fetch Pgyer's upload script in
before_install:before_install: - cd $TRAVIS_BUILD_DIR - wget -c https://raw.githubusercontent.com/Pgyer/TravisFile/master/pgyer_upload.sh -O pgyer_upload.sh - chmod +x pgyer_upload.sh -
Invoke the upload step in
after_script:after_script: - set -e - $TRAVIS_BUILD_DIR/pgyer_upload.sh "${TRAVIS_BUILD_DIR}/app/build/outputs/apk/release/<apk-name>" <PGYER_API_KEY> -
Find your Pgyer API_KEY on the API info page.
A complete example is on GitHub: https://github.com/Pgyer/TravisUploadAndroidDemo.
The separate script exists because a direct curl call can make Travis CI mark a run as passed even when the upload actually failed — e.g. on parameter errors. The script handles the common cases and returns matching exit codes, so Travis CI reflects the real outcome.